PRICING
SERVICES
DIGITAL MARKETING SERVICES
COMPETITIVE ANALYSISSEO SERVICESCONVERSION RATE OPTIMIZATIONWEB DESIGNCONTENT MARKETINGPAY PER CLICKRESOURCES
When you browse the web, you might come across the terms URL and HTTP, but do you know what sets them apart? A URL is like an address, pointing you to where information lives on the internet, while HTTP is the language that lets your browser talk to web servers to fetch that data. Both play essential roles in your online experience, yet they serve distinct purposes. Have you ever wondered how they work together to connect you to the digital world or what might happen if one didn't function properly? Let's explore these questions further.
A URL, or Uniform Resource Locator, is fundamentally the address you type into your browser to visit a specific webpage. Think of it as a digital map pointing you to your desired destination on the internet. It's how you tell your browser where to go and what to show you. When you enter a URL, your browser knows exactly which webpage you want to access, thanks to this precise address.
URLs are designed to be user-friendly, making it easier for you to find and access information online. It typically starts with a protocol, often "http" or "https", which tells your browser how to retrieve the resource. Following the protocol, you'll see the domain name, which identifies the website itself. For example, in "https://www.example.com", "example.com" is the domain name.
Understanding URLs helps you navigate the web more efficiently. You're able to identify secure connections when you see "https", ensuring your data is protected.
Plus, knowing how to read a URL can empower you to spot potentially unsafe websites. By grasping how URLs function, you gain more control and confidence while surfing the vast digital landscape.
Every URL comprises several key components that work together to direct you to the right destination on the internet. When you look at a URL, you'll notice it starts with a scheme, often "http" or "https", which defines how the resource will be fetched. This is followed by "://", a separator that divides the scheme from the rest of the URL.
Next, you'll see the domain name, which identifies the server where the resource resides. It's like the website's address. Sometimes, the domain is followed by a port number, especially if the server uses a non-standard port. The format looks like ":8080" and is essential when the server is set to listen on a specific port.
The URL might also include a path that resembles a file path on your computer. It points to a specific resource or page on the server, guiding you to the exact content you want.
After the path, there's often a query string, starting with a "?" that provides additional parameters for the server to process, like search terms.
Finally, you may find a fragment, preceded by a "#", that directs you to a specific section within the page. Understanding these components helps you navigate and utilize URLs effectively.
HTTP, or Hypertext Transfer Protocol, forms the foundation of any data exchange on the web. When you browse the internet, HTTP is the protocol that facilitates the transfer of data between your browser and the websites you visit. It fundamentally acts as a set of rules that govern how information is transmitted over the internet, ensuring that your requests to view web pages are correctly understood and processed by web servers.
Think of HTTP as a language that web browsers and servers use to communicate. When you type a URL into your browser, HTTP is what allows the browser to request the specific web page from a server, which then delivers the content back to you. This process happens almost instantaneously, making web browsing a seamless experience.
HTTP also plays an essential role in ensuring that the data transferred is accessible and readable by your browser.
It's significant to mention that HTTP itself doesn't store data; it merely facilitates its transfer. This protocol is integral to how we access and interact with the internet, providing the necessary framework for web pages to be delivered to your screen.
Understanding how HTTP works involves looking at the request-response cycle that powers web interactions. When you visit a website, your browser sends an HTTP request to the server hosting that site. Think of this as your browser asking the server for a specific page or resource.
The server, upon receiving the request, processes it and replies with an HTTP response. This response includes the requested data, like an HTML page, and metadata, such as status codes and content type.
You might wonder about those status codes. They're like messages from the server about how your request was handled. For instance, a "200 OK" status means everything went smoothly, while a "404 Not Found" indicates the server couldn't find the requested resource. These codes help you understand what happens behind the scenes.
HTTP is stateless, meaning each request-response pair is independent. The server doesn't remember past interactions, which can make it challenging to maintain a continuous session. That's where cookies and other technologies come into play, providing ways to track user sessions.
In essence, HTTP is the protocol that lets you and web servers communicate efficiently, ensuring you get the information you need.
When you explore the roles of URL and HTTP, you'll notice that each plays a distinct part in web communication.
The URL acts as the address, guiding you to the specific resources you seek by using its structure components like the protocol, domain, and path.
Meanwhile, HTTP functions as the protocol that facilitates the transfer of data between your browser and the server, ensuring you receive the right content quickly and efficiently.
To explore the components of URL structure, start by recognizing that a URL is fundamentally the address of a resource on the internet, while HTTP is the protocol that facilitates the transfer of data between your browser and that resource.
When you break down a URL, you'll notice several key components that help locate and identify the resource you're seeking.
Firstly, the scheme, like "http" or "https," tells your browser which protocol to use. Following that, the domain name, such as "example.com," indicates the server where the resource is hosted. Some URLs also include a port number, which specifies a particular gateway on the server, though it's often omitted when using standard ports.
Next, the path follows the domain and points to the specific location of the resource within the server, like "/about-us". If there are parameters added, they appear after a question mark, such as "?id=123", and are used to pass additional data to the server.
Finally, the fragment identifier, starting with a hash "#", directs you to a specific section within the resource, like "#section1". Understanding these components helps you navigate the web more effectively.
The HTTP protocol plays an essential role in how data is exchanged over the internet, acting as the foundation for any web communication you engage in. When you request a webpage, HTTP sets the rules for how your browser and the web server communicate. It guarantees that your browser receives the right data, whether it's text, images, or videos. Think of it as a language both your browser and the website understand, allowing them to exchange information seamlessly.
One key function of HTTP is to structure requests and responses. When you enter a URL in your browser, it sends an HTTP request to the server hosting the website. The server then responds with the content you've requested, using HTTP to guarantee the data is correctly formatted and displayed.
HTTP also manages sessions, keeping track of your actions as you navigate a site. It uses status codes to inform you about the success or failure of your requests, like "404 Not Found" when a page is missing.
At the core of understanding the internet's architecture, you'll find that URLs and HTTP serve distinct functions that are both vital yet fundamentally different.
URLs, or Uniform Resource Locators, act as the web's address system. They're the unique identifiers that direct you to specific resources, like websites, images, or videos. Think of a URL as a detailed map that pinpoints where a particular resource resides on the vast internet landscape.
On the other hand, HTTP, which stands for Hypertext Transfer Protocol, is the set of rules governing how data gets exchanged over the web. When you enter a URL into your browser, HTTP acts like a protocol-driven courier, ensuring your request for a webpage is sent correctly, and the response is delivered back efficiently. It manages the communication between your browser and the server hosting the website.
In essence, while URLs tell you where to go, HTTP dictates how you get there and retrieve the information you need. Understanding these differences can help demystify how your web browser navigates the internet, ensuring you grasp why both components are vital for seamless web browsing experiences.
Misunderstandings often arise when people confuse URLs with HTTP. You might think they're interchangeable, but they serve different purposes. A URL (Uniform Resource Locator) is like an address for a specific resource on the internet, such as a webpage, image, or video. It tells you exactly where to find something online.
On the other hand, HTTP (Hypertext Transfer Protocol) is a set of rules for transferring data over the web. It's the protocol used by browsers to communicate with servers and retrieve the content identified by the URL.
Another common misconception is thinking that HTTP is part of the URL. While "http://" does appear at the beginning of many URLs, it's just stating the protocol being used. The URL itself includes the protocol, domain name, and often a path to a specific resource.
Some people also believe that HTTPS (the secure version of HTTP) is a totally separate entity. It's actually just HTTP with an added layer of security, using encryption to protect data during transfer.
Understanding these distinctions helps you navigate the web more effectively and appreciate the roles URLs and HTTP play in your online experience.

Understanding the difference between URLs and HTTP leads directly to recognizing their importance in web browsing. When you type a URL into your browser, you're fundamentally providing the address of a resource you want to access on the internet. The URL, or Uniform Resource Locator, acts like a house address, guiding your browser to the right place.
Without URLs, finding specific websites would be like trying to locate a house without directions.
HTTP, which stands for Hypertext Transfer Protocol, plays a different but equally critical role. It's the protocol that enables communication between your browser and the web server where the site is hosted. Think of HTTP as the language they both speak to exchange information.
When you click a link or submit a form online, HTTP facilitates this interaction, guaranteeing data travels back and forth smoothly.
Together, URLs and HTTP form the backbone of web browsing. URLs direct you to your desired destination, while HTTP guarantees you can access the content there efficiently and securely.
Understanding how they work helps you appreciate the seamless browsing experience you often take for granted. Without them, maneuvering the web would be far more complicated.
In exploring the differences between URLs and HTTP, you've learned that URLs are the addresses pointing you to online resources, while HTTP is the protocol ensuring smooth communication between your browser and servers. URLs tell you where to go, and HTTP figures out how to get you there. Understanding these elements clarifies their roles in web browsing and dispels common misconceptions. So, next time you surf the web, you'll appreciate the seamless teamwork behind your clicks.
Even if you aren’t familiar with it, you probably recognize HTTPS — It’s that little string of letters you see at the beginning of most URLs these days. If you’re using an Internet browser like Chrome or Firefox, it’s probably accompanied by a padlock symbol or something similar.
It should look like this:

HTTPS stands for Hypertext Transfer Protocol Secure. It’s an extension of the Hypertext Transfer Protocol (HTTP), which is the foundation for all data communication on the Internet.
In this article, we’ll explore what HTTPS is, why it matters for SEO, and what you can do to enable it on your website.
Before we get into what HTTPS is and how you can enable it, let’s do a refresher on HTTP so you have some understanding of why it’s important.
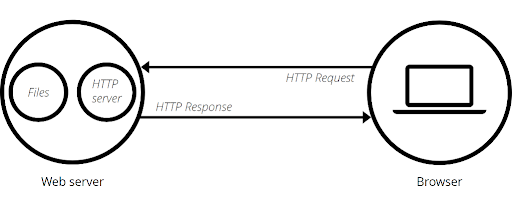
Put simply, HTTP is a system for sending and receiving information (data) across the Internet. Communicating across the Internet is always an exchange of information between a web client, such as an Internet browser, and a web server.
A web server is a combination of software and hardware dedicated to serving client requests online — you can think of it as a big computer that has files and software stored on it for the purpose of serving up websites to users.
When you arrived at this website, your Internet browser requested the web server that hosts the website to send data, which was then sent and rendered to you through your browser. All this requesting and responding occurs via the protocol for Internet communications: HTTP.
MDN Web Docs (Mozilla) uses a simple diagram to explain how this works:
Today, when your browser connects to a website, it can do so using either HTTP or HTTPS depending on what’s enabled on the website’s server. But, if you connect via HTTP and not HTTPS, you’ll probably get a notification that says your connection is “not secure.”
That’s’ because HTTP isn’t an encrypted protocol. Anyone monitoring your session can read your requests to the web server and its responses. If you’re sending sensitive information like a password or social security number through that connection, a bad actor could potentially pick it up and use it for malicious purposes.
This is why your browser might warn you when you’re using an insecure connection:

To make that connection secure, all data being sent to and from the web server needs to be encrypted. That’s where HTTPS comes in.
As we noted, the “S” in “HTTPS” stands for “secure” — it’s the secure version of HTTP. This protocol uses Transport Layer Security (TLS), a cryptographic protocol, to keep communications between your browser and a web client private. Most HTTPS protocols used to use the Secure Sockets Layer (SSL) cryptographic protocol, which was the predecessor of TLS.
When your website is secured with HTTPS, if anyone is monitoring communications between the web server and client, they’ll only see useless encrypted data. This makes HTTPS a safe protocol to use when sending sensitive information over the Internet.
As you can imagine, most website owners want to have HTTPS enabled so that their users know they are safe in using their website. Allowing users to send data over an insecure connection could be catastrophic for some companies and their customers. Can you imagine what would happen if it turned out that a bank’s customers were doing all their online banking through an insecure website?
But HTTPS is also important for any other type of website. Even if you don’t accept login information or other sensitive data from your users, you should still enable HTTPS. It’s the right thing to do for your users, and there are SEO benefits as well.
From a technical SEO perspective, we just need to turn to Google to understand the importance of HTTPS.
In 2014, Google announced that it would be giving a ranking boost to websites that use HTTPS. In their own words, this would be “a very lightweight signal” that would only give websites a relatively small benefit. They even said this signal carries “less weight than other signals such as high-quality content.”
But, more importantly, Google shortly thereafter proposed that web browsers mark websites that don’t use HTTPS as “not secure.” Since then, most browsers have taken up this proposal, which is why you get prompted when you enter a website that doesn’t use HTTPS.
This can have a devastating effect on your traffic and your click-through-rates. Nobody wants to use a website that has been marked “not secure,” regardless of whether they plan to transmit any sensitive data. Furthermore, some browsers will block users from entering an insecure website before they can even see the content, prompting them to hit the “back” button just to stay safe.
There are other SEO benefits to using HTTPS, too.
For one, you can get more data about where your traffic is coming from. Traffic sent from a secure HTTPS site to an insecure HTTP site has its referral data stripped away, according to Moz. That means all that traffic is listed as “direct” traffic, so you can’t tell where it was referred from.
HTTPS is also a huge trust factor for Internet users and other webmasters. People will be more likely to share and link to a secure website than an insecure one.
To enable HTTPS, you need a valid SSL certificate. This is a small data file that binds a cryptographic key to your website, or even a string of domains under your ownership.
You used to have to purchase SSL certificates separately. But if you built your site using certain website building applications, such as Squarespace or Shopify, it probably generated an SSL certificate for you. You should already have HTTPS enabled.
Similarly, if your website hosting is managed remotely by a major hosting provider like Bluehost, GoDaddy, HostGator, DreamHost, etc. you may already have an SSL certificate as part of your hosting package. That means HTTPS should already be enabled.
If it isn’t but should be, you should contact your hosting provider. If you still have HTTP and you don’t have an SSL certificate as part of your website package, you’ll have to buy one.
Getting an SSL Certificate is relatively easy. You may be able to buy one directly from your hosting provider if they haven’t issued you one already. For example, GoDaddy has a purchasing page dedicated solely to selling SSL certificates.
But you don’t have to go straight to your hosting provider, as their prices might be high. You can also buy a certificate from third-party sources known as Certificate Authorities (CA).
There are even some non-profit CAs that offer SSL certificates for free. Sites like Let’s Encrypt, SSL For Free, and Cloudflare all offer free SSL certificate options.
Manually configuring an SSL certificate takes several steps, and it requires you to install the certificate on the origin server where your website “lives.”
If you pay for managed hosting services, ask your hosting provider to configure your SSL certificate for you.
This is usually the best route if you don’t have the technical know-how to do this yourself or if you only have limited access to your server. What’s more, if you configure your certificate incorrectly, it could prevent users from finding your website.
If you decide to do this yourself, keep in mind that web hosting control panels and CA login dashboards vary. These are the basic steps you’ll need to follow:
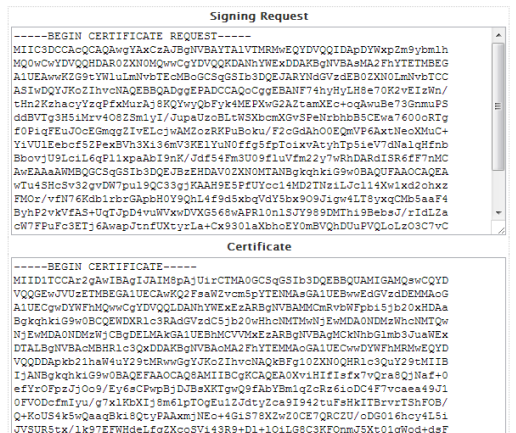
If you’d like to verify your certificate, just click on the security icon in your browser (the padlock):
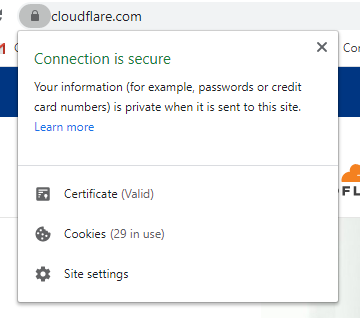
Then, click on “Certificate,” and you should see details about your SSL certificate, such as which CA it was issued by, who it was issued to, and for how long the certificate is valid.
That’s it. You’re secure!
Remember, configuring a certificate incorrectly could make your website insecure, which defeats the purpose of enabling HTTPS in the first place. If you don’t know how to do this yourself, rely on a developer or your hosting provider to do it for you.
Bliss Drive can help, too. Contact us now to talk about how you can keep your website secure and improve your search rankings at the same time!
Enjoyed this article? Read next: Mobile SEO: A DIY Guide to Optimize for Smartphones in 2021